
Adding content to a specific place inside the WooCommerce Loop will make this field visible. These fields are subject to change depending on every user’s needs. Therefore in this article, I will be listing as many possibilities as possible and providing solutions. Firstly, before we move on with coding, let’s have a look at why a person should consıder to insert content to a specific place.
Why You should add content to a specific place?
The product listing page is important, since:
- It is the most visited website by visitors looking for a product
- It is the most suitable page to see the effect when you provide product-related information.
Now suppose that you place “Free shipping over $100” note just into the product page and the product that your customer will buy worth $70, your customer will start having look at products worth $25. What if you offer 24/7 support? Consequently, your customer will not hesitate to shop. With such messages, we should encourage your customer to reach a happy ending in shopping.
Well, what can you show in this content?
- Shipping offerings
- Your perfect customer support
- Payment methods
- Black Friday or other campaigns
- Your new collection
- Promotions etc…
It is up to your target audience and the design of your category page to add text or image to the Woocommerce product loop. If so, how to make all these things we shared via coding? Let’s learn how to technically add content to the WooCommerce archive page.
Add Content to end of the first row in WooCommerce Category Loop
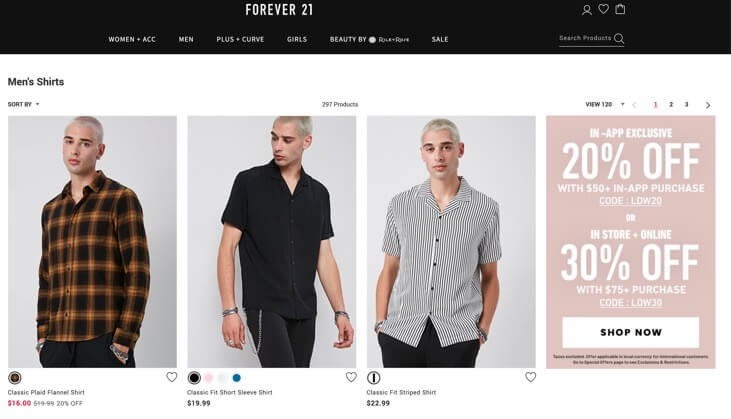
For instance, you may want to display your content or promotion only once, just like it is on the Forever21 webpage below. There, it is added as the last element of the row. To clarify, let’s consider that there are four columns in one row and if you want to add this content to the last column, you should add the following code into your functions.php.
All the code in this page should paste functions.php after that please save the file. In addition, I strongly advise that please use a child theme.
Note: You should pay attention that this content is only added to the first row.
// Adding custom block end of the first row

add_action( 'woocommerce_shop_loop', 'amc_add_content_to_end_of_the_first_row' );
function amc_add_content_to_end_of_the_first_row() {

	global $wp_query;

	// We know the column count here
	$columns = esc_attr( wc_get_loop_prop( 'columns' ) );

	if ( ( $wp_query->current_post + 1 ) == $columns && $wp_query->current_post != 0 && is_product_category() ) {
		echo esc_html__("Custom content", "amc");
	}

}
Add Content after X product for once
When you want to add your content after X products for once, for example, you want your content to be displayed after the fourth product, you should apply the following code.
! ( $wp_query->current_post ) == 4 For instance, change the number 4 per your requirement. If you want to add it before the 6th product, write 6.
// Add Content after 4 product for once

add_action( 'woocommerce_shop_loop', 'amc_add_content_after_4_product_for_once' );
function amc_add_content_after_4_product_for_once() {

	global $wp_query;

	if ( ( $wp_query->current_post ) ==  4 && $wp_query->current_post != 0 && is_product_category() ) {
		echo esc_html__("Custom content", "amc");
	}

}
Add Content in the first place and x.rd place at the same time
If you want to add the content of your special product in the first place and 6th place at the same time, just like Dior’s website did, then the following code will work for you.
// Add Content in the first place and x.rd place at the same time

add_action( 'woocommerce_shop_loop', 'amc_add_content_in_the_first_place_and_after' );
function amc_add_content_in_the_first_place_and_after() {

	global $wp_query;

	if ( ( $wp_query->current_post ) ==  0 || $wp_query->current_post  == 4 && is_product_category() ) {
		echo esc_html__("Custom content", "amc");
	}

}
Add Content after every 3 product
Let’s come to the repetitive content. If you want to add your content after every 3 products, then you can use the following code.
! The thing you should pay attention here: If there are three columns in one row and you want this custom content that you will add to be full-width, then I suggest you try the solution below.
( $wp_query->current_post + 1 ) % 3 ) You can change the number 3 here and customize it as you wish.
// Add Content after every 3 product

add_action( 'woocommerce_shop_loop', 'amc_add_content_after_every_3_products' );
function amc_add_content_after_every_3_products() {

	global $wp_query;

	if ( (  $wp_query->current_post % 3 ) ==  0 && $wp_query->current_post !=  0 && is_product_category() ) {
		echo esc_html__("Custom content", "amc");
	}

}Add Content after every row
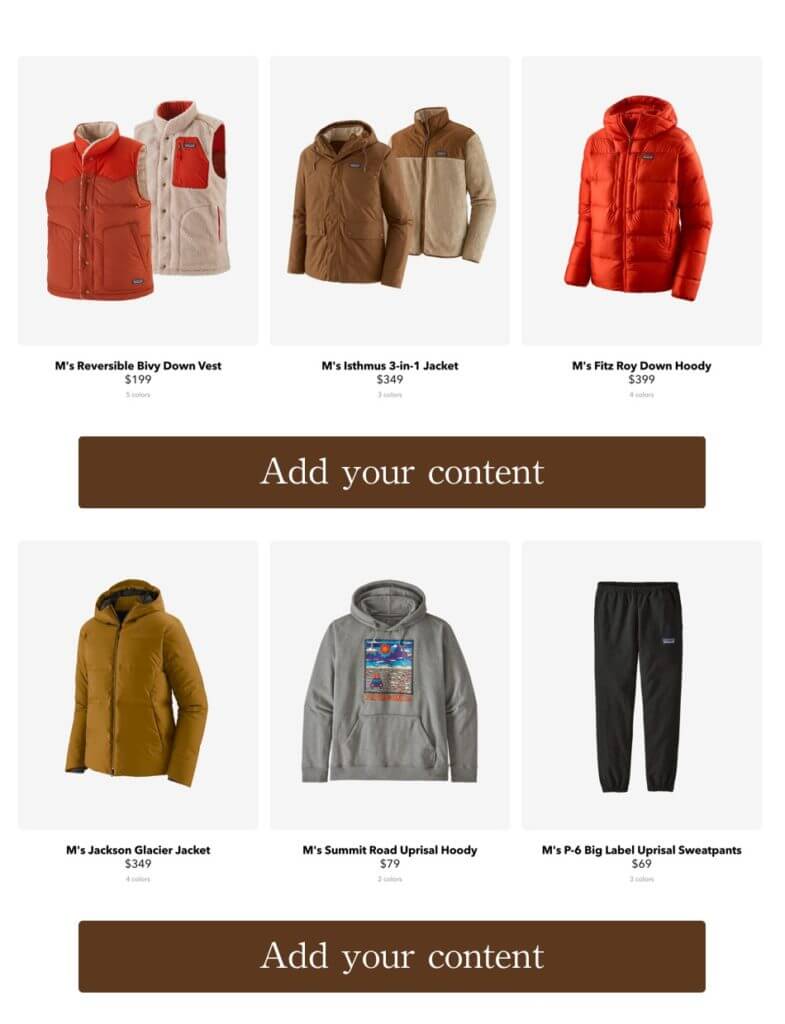
If you want to add customized content after every row again and again, you can use the code below.
// Add Content after every row

add_action( 'woocommerce_shop_loop', 'amc_add_content_after_every_row' );
function amc_add_content_after_every_row() {

	global $wp_query;

	// We know the column count here
	$columns = esc_attr( wc_get_loop_prop( 'columns' ) );

	if ( ( $wp_query->current_post % $columns ) == 0 && $wp_query->current_post !=0 && is_product_category() ) {
		echo esc_html__("Custom content", "amc");
	}

}
Add Content before product loop
If you want to add custom content before the product loop, then you need to use the following code. Here, we will write our code by using woocommerce_before_shop_loop action.
// Adding content before loop

add_action( 'woocommerce_before_shop_loop', 'amc_add_content_before_loop' );
function amc_add_content_before_loop() {

	if ( is_product_category() ) {
		echo esc_html__("Custom content", "amc");
	}

}
Add Content after product loop
Contrarily, if you want to add content after the product loop, you should add the following code to functions.php.
// Adding content after loop

add_action( 'woocommerce_after_shop_loop', 'woocommerce_after_shop_loop' );
function woocommerce_after_shop_loop() {

	if ( is_product_category() ) {
		echo esc_html__("Custom content", "amc");
	}

}
Add Content to the middle of Woocommerce loop
If you want to add content to the middle of the WooCommerce loop, apply the following code. On the other hand, when you have an even number of products on the Category page, the display will be more balanced.
In case you want to change the number of products to be shown on a page in WooCommerce, click here.
This content will be added to all pages. If you want to add it to the middle of the first page only, then use the following solution.
// Add Content middle of the WooCommerce Loop

add_action( 'woocommerce_shop_loop', 'amc_add_content_middle_of_the_loop' );
function amc_add_content_middle_of_the_loop() {

	global $wp_query;

	// We are getting products per page in the WooCommerce Loop
	$product_per_page_count = $wp_query->get( 'posts_per_page' );
	$middle_count = 	$product_per_page_count / 2;

	if ( ( $wp_query->current_post % $middle_count  ) == 0 && $wp_query->current_post !=0 && is_product_category() ) {
		echo esc_html__("Custom content", "amc");
	}

}
Add Content to the middle of First WooCommerce Category Page
Supposing that the code you will add will be visible only on the first page, then this code will work for you. Don’t worry, it checks the number of products to be shown on a page automatically and then adds content.
//Add Content to the middle of First WooCommerce Category Page

add_action( 'woocommerce_shop_loop', 'amc_add_content_middle_of_the_first_page' );
function amc_add_content_middle_of_the_first_page() {

	global $wp_query;


	// We are getting products per page in the WooCommerce Loop
	$product_per_page_count = $wp_query->get( 'posts_per_page' );
	$middle_count = 	$product_per_page_count / 2;
	$paged = (get_query_var('paged')) ? get_query_var('paged') : 1;

	if (  $wp_query->current_post == $middle_count && $paged == 1 && is_product_category() ) {
		echo esc_html__("Custom content", "amc");
	}

}
In conclusion, we learned how to add div or content to the WooCommerce loop. You only think about what content do you want to show.
In addition, If you interested in a custom solution you can contact me from info@woofocus.co.uk